Author Archives: collegekitschin

a hiatus explained

shortly after I wrote my last post in November (November!), I got sick. I mean really, really sick. I have some chronic illnesses and a couple of them have flared up. It hasn’t been fun, and I’m still recovering.

When you’re violently sick, exhausted and in chronic pain, and still dealing with large quantities of school work and personal commitments, you don’t really feel like cooking. Hence the lack of posts.

I’m back home for the summer and now that I have more time, I’m slowly venturing back into the kitchen. I may update, I may not.

But I am making mango-lime sorbet tomorrow, so chances of a post are good.

therapy baking

for the first month and a half of the semester I almost exclusively our school’s notoriously terrible food. Once my meal plan ran out I ate…. well not much besides ramen and cheese crackers. And then I ran out of ramen and really wasn’t eating at all.

but that’s about to change because yesterday

I WENT TO THE STORE

i know, it’s surprising

And then tonight, I actually decided to get out of bed (another surprise!) and head down to the communal kitchen. (Since moving, I no longer have a stove.)

The expedition to the kitchen started with an impulse to make candied ginger. Then I decided to make some very belated birthday lemon bars, bread, and since I probably should eat something, curry. (somehow i don’t think those are all getting made tonight)*

Because I only have one pot currently, I had to prioritize what to cook first. Obviously I chose the ginger candy.

Candied ginger is basically the best thing. Plus you can use the syrup in all kinds of delicious ways, such as adding it to ginger bread or pouring it over frozen strawberries. or even…. lemon bars!  

Anyway

Candied Ginger

from David Lebovitz

  • 1/2 lb Ginger
  • 2 cups Sugar

First, get yourself a hunk of ginger. (I used a half pound here). You need to peel it – the easiest way to do this is with a spoon. Then, cut it into slices as thinly as you can manage, but it isn’t that big of a deal.

Next, you need to blanch the ginger. Boil enough water to cover the ginger in a (non-reactive) pot. Add the ginger once it’s boiling and let simmer for 10 minutes. Enjoy the smell of ginger. Drain the water.

Now do this again!

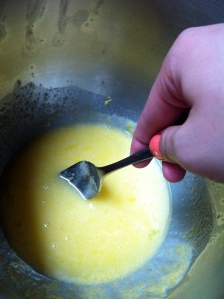
==> Meanwhile

Finally! You are done blanching. Now add 2 cups sugar and 2 cups water to the ginger. I know, it is a lot of sugar. But you are making candy after all.

Boil until the water reaches 225 degrees. Of course, if you don’t have a candy thermometer (I don’t) just boil it until it begins to get syrupy. I am never completely sure if I have cooked it long enough, but that’s okay because I’m really in it for the syrup. The ginger is just a bonus.

Let everything cool slightly, pour the syrup into a container and lay the ginger on a sheet to cool. I guess you could put granulated sugar on it at this point if you really want to.

Sadly, now you must wait an hour before eating your delcious spicy candy.

the perfect amount of time to make….

Lemon Bars! Part 2

from Smitten Kitchen

but you should just go to her recipe though because it’s pretty much what I did  and I’m getting tired of typing.

man I’m tired. You’re probably tired of reading this too. Forget the chickpeas and bread, I’ll just eat strawberries in ginger for dinner. (just kidding, I bought tons more ramen!)

And then I will feed lemon bars and ginger to my lovely friends. Thank you guys for being there

*called it

Tagged , , , , , , , ,

study break: calculus III edition

a fortifying smoothie:

1 carrot

1 handful mixed berries

1 handful spinach

1 banana

enough apple juice to blend it

secret library smoothie

delicious!

next week: whole wheat chocolate chip cookies*

visiting actual ducks during an actual study break

*yeah that totally didn’t happen

Tagged , , , ,

junior year and chana masala

it feels like the smallest blink of time since i’ve posted but it’s been… three weeks

I’ve just started my junior year of classes. I’m only taking 16 credit hours but I’m working two jobs and frankly, I’ve mostly been eating goldfish crackers and cafeteria food. I spend most of my free time doing calculus problems (once I went to the beach!) A sign of how stressful this has been: I am currently listening to the angsty music of my youth.

well this is actually for my economics class. the book said this was a simple problem

this is what I’m missing out on

But last week I actually made a curry (I know I post about this a lot, but this recipe is really good)

Chana Masala

This is my mother’s recipe. I believe she adapted it from the Vegetarian Epicure by Anna Thomas. This is a simple and delicious dish.

Ingredients

  • 2 cans chickpeas
  • butter or olive oil
  • one tomato
  • cilantro
  • garlic
  • lemon juice to taste

SPICES:

  •  Pimenta roja or cayenne pepper
  • Garam masala
  • curry powder
  • garlic or onion powder
  • lots of turmeric

I am not a very neat cook

Step 1: rinse the chickpeas, cover them in water and cook them over medium heat until they are beginning to get soft.

Step 2: put the butter or olive oil in a sauce pan. I use my teensy one & use enough oil/butter to cover the bottom of the pan. This probably amounts to 1-2 tbs. Add the spices and crushed garlic, stir and cook over low heat for a few minutes.

Step 3: add the spices, lemon juice and chopped tomato to the chickpeas. this should be done about halfway through.

Step 4: let the whole thing simmer for awhile. At the end, chop up some cilantro and add it.

Then we eat!

lunch time!

Plus it has the Dmitry Seal of Approval. What more can you ask for?

Now it’s time to get back to work!

Tagged , , , , , ,

apple pie forever

I make apple pie a lot, more than almost any other baked good. I always forget to post about it though.

Probably because I’m too busy eating pie.

However, last night I was making pie with some old friends and I decided that enough is enough. It is Time for Pie.
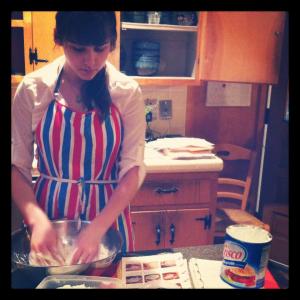
MAKING PIE

favorite pie apron

Crust

(for 1 8-9 inch pie crust)

  • 2 cups flour
  • 2/3 c shortening or butter* (cold)
  • 1 tsp salt
  • approximately 1/4 cup ice water
  • something like 1 tsp sugar, though I need to check

Times it by two to make a double crust, which i recommend.

*Shortening is good for flakeniess, butter for flavor. There are many theories about the ideal combination for maximum deliciousness

Pie crust is much easier than people seem to give it credit for. Now, to have a masterful, gorgeous pie crust is harder, but a tasty made-from-scratch pie crust is fairly simple.

First, mix flour, salt and sugar together. Then “cut” the shortening in. Personally, I think the easiest way to do this is to simply crumble the butter (or what have you) into the flour with your fingers, until the whole thing looks like small grains of sand. Then, press it all together and fold it for a few minutes. After folding it so it looks marbly, shape it into a disc, cover it in plastic wrap and stick it in the fridge for about an hours.
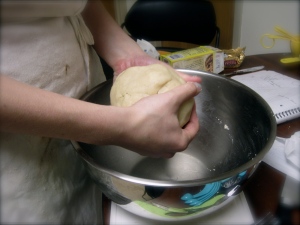
It should look like this

Pie Filling

  • 6 apples, 1-2 granny smith
  • 1tbs butter
  • ~2tbs sugar, to taste
  • 1/4 cup sugar
  • cinnamon to taste
  • optional: nutmeg, other spices
  • ~1-2 tbs Lemon juice

Now core, peel and chop the apples into quarters (or smaller). Add the sugar, flour and cinnamon to taste. Note: it should taste delicious. Add lemon juice to taste if it’s too sweet.

Construction: roll out the pie dough into a circle on a floured circle. Take your time – if it doesn’t work at first, reroll it. (Pro tip: If you don’t have a rolling pin, you can use a wine bottle washed and with the label removed)

for a 8-9 inch pie pan, it needs to (probably) be about 13 inches in diameter, but don’t stress about it. To put the dough into the pan, fold it in half and then in half again. Put the dough in the pan and unroll it. Fill it with apples (and pour in the juice at the bottom). Roll the second pie crust for the top. to make a lattice, cut the rolled out dough into strips approximately one inch wide and weave them over the top.If you are doing a solid top, make slits in it

(I had a picture of this but I lost it when I replaced my phone. Here is a different photo instead.)

here is a picture of a fuzzy alpaca

Bake at 400 for about 40 minutes, or until the top crust is golden brown and the apple interior is kind of bubbly.
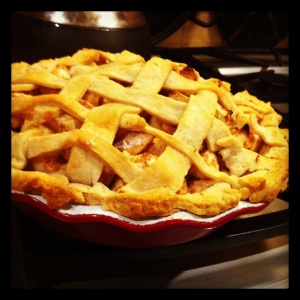
PIE

instagramin’ around

Serve warm with cold icecream or homemade whipped cream.

Or eat it cold for breakfast. It’s the best way to do it.

Tagged , ,

Lemon bars: part one

I made some lemon bars a few days ago. (and then I ate all of them, there aren’t any left now.)

I’m fasting today while I wait to get my cholesterol tested and writing about this is making me so hungry. torture!

Anyway, I used Betty Crocker’s classic recipe

She rarely lets me down. This was almost one of those times.

Lemon Squares

Ingredients

  •  1 cup of flour
  • 1/2  c butter, softened (one stick)
  • 1/4 c powdered sugar
  • 2 eggs
  • 1 c sugar
  • 2 tbsp lemon juice
  • 2 tsp lemon peel
  • 1/2 tsp baking powder
  • 1/4 tsp salt

the eggs at the farmer’s market are so pretty
farmer’s market, oh how i have missed you

Heat oven to 350 right away. Then mix butter, flour and powdered sugar (weird right?) together. It will be a very soft dough. Press it into the bottom of an ungreased 8x8x2 or 9x9x2 pan. Bake it for about 20 minutes, until it starts to be a little bit golden brown. Mine turned out extremely flaky, maybe too much so. (If anyone has fixes for that… let me know)

Meanwhile, make the lemon curd. Beat the remaining ingredients for about three minutes, until they are light and fluffy. I probably did not do this for long enough.

yuck

probably because I tried to do it by hand

I also added extra lemon juice. Pour over the hot crust and bake for another 25 minutes, at which point there will be “no indentation if touched light in the center” (thanks betty c!)

let it cool. I highly recommend freezing these, since they are exponentially better.

VERDICT: okay but disappointing

Me, excited for lemon bars. how quickly that smile would fade. also i was making a thumbs up, you just can’t tell

They were just not as good as I remembered. And definitely not zingy enough. I thought about making a very tart frosting for them from powdered sugar and lemon juice (to taste) but I am not a fan of frosting on bar cookies (eg, frosted brownies and i are NOT FRIEND). So i let it be, and ate them anyway, since they were still quite tasty. They just weren’t what I wanted to bake.

Now, I am not a person who knows when to quit. So expect an update soon, entitled LEMON BARS: PART TWO, the LEMONING

okay sorry that was a REALLY bad joke


I’ve been lazy with photos recently, so today i am going to town

Tagged , , , , ,

Pie Update & Blog update

Last week I made a peach pie. It turned out well, but not as well as it would have if I’d been more than 60% awake when I made it.

(It got a little burnt, and the crust was flatter than I like them to be.)

I reccomend going to smittenkitchen’s site for the ingrediants and instructions, but here they are anyway:

Crust
2 1/2 cups (315 grams) all-purpose flour, plus more for dusting surfaces
1 tablespoons (15 grams) granulated sugar
1 teaspoon table salt
2 sticks (225 grams, 8 ounces, or 1 cup) unsalted butter, very cold
1/2 cup water, very cold

Filling
About 3 1/2 pounds peaches (approximately 6 large, 7 medium or 8 small)
1 tablespoon fresh lemon juice, from about half a regular lemon
1/4 cup granulated sugar (see note up top; use 1/3 cup for a sweeter pie)
1/4 cup light brown sugar (ditto)
1/8 teaspoon ground cinnamon
Few gratings of fresh nutmeg
1/8 teaspoon table salt
2 tablespoons minute tapioca, ground to a powder (see note up top), or 3 tablespoons cornstarch or potato starch

To finish
1 tablespoon milk, cream or water
1 tablespoon coarse or granulated sugar

Make your pie dough: Whisk together flour, sugar and salt in the bottom of a large, wide-ish bowl. Using a pastry blender, two forks or your fingertips, work the butter into the flour until the biggest pieces of butter are the size of small peas. (You’ll want to chop your butter into small bits first, unless you’re using a very strong pastry blender in which case you can throw the sticks in whole, as I do.) Gently stir in the ice water with a rubber spatula, mixing it until a craggy mass forms. Get your hands in the bowl and knead it just two or three times to form a ball. Divide dough in half. Wrap each half in plastic wrap and flatten a bit, like a disc. Chill in fridge for at least an hour or up to two days. Slip plastic-wrapped dough into a freezer bag and freeze for up to 1 to 2 months (longer if you trust your freezer more than I do). To defrost, leave in fridge for 1 day.

Meanwhile, prepare your filling: Bring a large saucepan of water to boil. Prepare an ice bath. Make a small x at the bottom of each peach. Once water is boiling, lower peaches, as many as you can fit at once, into saucepan and poach for two minutes. Using a slotted spoon, transfer to ice bath for one minute to cool. Transfer peaches to cutting board and peel the skins. In most cases, the boiling-then-cold water will loosen the skins and they’ll slip right off. In the case of some stubborn peaches, they will stay intact and you can peel them with a paring knife or vegetable peeler and curse the person who made you waste your time with poaching fruit.

Halve and pit the peaches, then into about 1/3-inch thick slices. You’ll want 6 cups; it’s okay if you go a little over. Add to a large bowl and toss with lemon juice. In a small dish, stir together sugars, cinnamon, nutmeg, salt and cornstarch until evenly mixed. Add to peaches and toss to evenly coat.

Preheat: Oven to 425 degrees.

WHICH is basically what I did! My peaches mostly worked out. The slightly less ripe ones had to be peeled though.

Okay that’s really all i have bout that.

more later, since I’m making lemon bars.

BLOG UPDATE:

I’m going back to school soon, at which point it will (hopefully) be easier to keep up a regular post schedule. I’ve been moving around a lot lately which makes it hard to a) cook and b) write about it.

Tagged , , , , , ,

PIE COOKIN’

For weeks now, I have been promising to make peach pie

WEEKS


Tonight I bit the bullet and went for it. I’m so tired, and of course, there were endless mishaps.

I love baking – it’s what got me started in the first place. I didn’t start cooking until much later.

Anyway, coincidentally, smittenkitchen posted a peach pie recipe recently, and it’s many of my friends’ last day here… and so… it just seemed like the right time.

I’ll post the recipe later. So far, it seems very promising. it smells really good.

Tagged , , , ,

experimental onions

I’ve been cooking lots of onions recently.

I’ve been extremely tired (I’m working lots of hours) and when I get home and finally finish all my work, there’s not much I want to do besides flop down on the couch and watch Community. It’s been a challenging summer.

But y’know, food is important. And we don’t have a blender, so I actually have to do more than dump a bunch of fruit and veggies into it.

So I’ve tried lots of things, some of which I’ve posted about (see: Curry) but mostly they waste away in my recipe file (see: flopping down on the couch).

A few weeks ago I made some fajitas that turned out really well; before that there were various pasta dishes. Recently there was a not-so-magic curry that I can’t bring myself to eat.

The common factor here is onions. Mostly yellow onions, mostly sautéed. Even within that narrow category I’ve found endless variations.

In case it wasn’t obvious, let me tell you: I love onions. I know a lot of people don’t, including the fastidious Dmitry (“It’s not that I don’t like them, I just don’t understand why you use so many“)

Those people tend to be sad with my cooking.

In any case, in today’s experiment, I made caramelized onions. I have a lot of trouble with these, partly because I’m impatient and get tired of waiting on them, and partly because I actually like the crispy burnt ones. However today I managed to stand around in the kitchen for a while, patiently stirring them over a medium heat (probably because I’ve been so tired).

They turned out well. I did a little experimenting (adding butter, adding sugar) and the result was very tasty, but very rich. Almost too rich. Next time – less sugar, maybe only 1/3 tsp or less. I think they needed to be cooked longer as well to brown them more, but at that point I was too hungry to wait.

In the end, I just put them over some plain pasta with a little salt.

I ate it with sparkling water while watching community on the couch.

And you know what? It was delicious.

Tagged , , ,

magic curry

Every so often you have one of those days were you can do no wrong in the kitchen.

Last Thursday was one of those days.

I got home from work and decided to make curry. I didn’t have a recipe or much of a plan at all. Or for that matter, many ingrediants.

Not to mention, I burned the onions, used a lime instead of a lemon, didn’t measure the spices, added way to much sirarcha sauce, forgot the whole thing on the stove for about twenty minutes, and forgot to make rice so that it had to be reheated before I could finally sit down for dinner.

And yet it somehow produced one of the best curries I’ve ever made. I probably will never be able to reproduce it exactly since I didn’t take measurements or watch the time but, here’s hoping.

There probably is some kind of cooking lesson in there somewhere for me isn’t there?

Magic Curry

As I mentioned, I barely know what I did here, so… improvise! Maybe that’s the lesson of this recipe.

Ingredients:

  • 1 can of chick peas
  • 1/2 a yellow onion
  • 1 clove garlic
  • Sriracha sauce
  • Garam masala
  • cumin
  • tumeric
  • 1 lime

Rinse the chickpeas, and put them in a small pot covered in water. Bring it to a simmer. Dump a bunch of spices, srirarcha sauce and lime juice in. (seriously, this is what I did)

Meanwhile sauté the onions, adding the garlic towards the end. I burned them, but they were still delicious, so I added them anyway about half way through the cooking time.

Cook it all until the chickpeas are soft enough to eat and are breaking apart. Add more water as you need to prevent it from burning. Remember to make rice ahead of time!

and then… MAGIC

Tagged , ,